
Capture the Flag
Orientation
Motivation
Modern robotics systems are almost always based on a Linux system. Therefore it is essential to know at least the basics of the command line in Linux. Common tasks here are executing commands, searching and finding files and outputting files. The online exercise that can be done here makes it possible to learn and practice the three most common tasks.
Requirements
- You do not need any special prerequisites.
- You need a program to access a remote computer. The following programs are suitable for this:
- Under Windows, PuTTY is recommended.
Alternatively, you can also install openSSH on Windows, which is described HERE. - Under Linux/MacOS, openssh-client is recommended; there exists also a portable version of the software openssh portable
Goals
After completing the exercise you will be able to…- … execute available programs on the command line.
- … find files based on certain features.
- … analyze and display the contents of files.
Literature
On the Internet you will find a variety of different manuals. One of the shorter and still understandable manuals can be found HERE. Deeper information can be found HERE. In the next section, however, the required basics are explained again. A page where complete commands are explained can be found under ExplainShell.
Guide
The exercise takes between 60 and 90 minutes. The concrete duration depends on the individual learning progress.
The following activities are expected of you:- In the module Basics
- Read up on and develop an understanding of the necessary theory.
- In the module Exercise
- Read the general conditions of the exercise.
- You will get a hint how to start with the exercise.
- In the module Application
- You will receive the necessary instruction for each exercise to complete the exercise.
- In the module Considerations
- You get a short summary of the results.
Basics
In the following, connection possibilites to remote servers as well as the basics of the Unix shell are shown.
Connection to a remote server
PuTTY under Windows
After starting PuTTY, the graphical user interface is created, which is shown below. Connecting to a remote server requires a Host Name and a Port. The Host Name describes the name of the server, while the port is a protocol which assigns a connection on the remote server. Data are transferred over the port, when the connection has been established successfully. In order to work on this online exercise, an SSH connection to engine.ie.technikum-wien on port 4841 is required. In PuTTY, the corresponding input fields have to be filled with these information. In addition, the option SSH must be chosen since an SSH connection is required. This option represents a standard setting in PuTTY and is usually ticked on startup. For this online exercise no more options have to be set. Hence, by clicking the button Open the remote connection is established. If the connection is assigned for the first time, a warning dialog will be shown which is accepted by clicking Yes.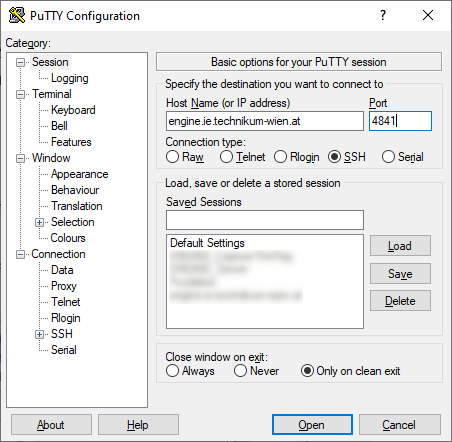 If the connection is successful, a console window will be opened, which is used to interact with the remote server.
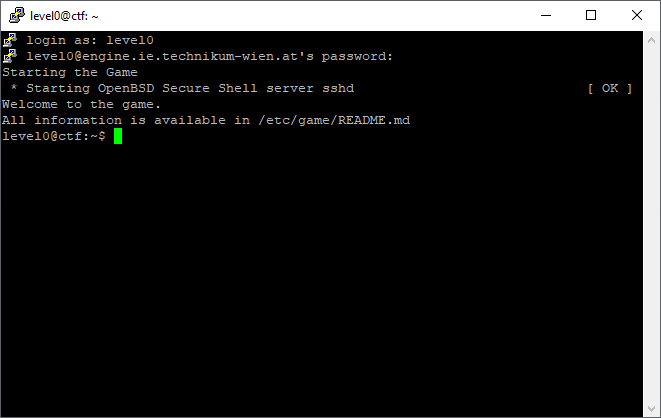
Before the interaction can be started, a username is required.
The online exercise starts with user level0 which has to be typed into the commandline and confirmed with enter.
Thereafter, the corresponding password is required, which is also level0.
While typing passwords into a shell, no characters will be shown!
This is not a bug and applied for security reasons.
After typing in the password, it is confirmed by enter.
If the information "Starting the Game" is shown in the shell, the connection to the server has been succeed.
Further information will be shown in the shell, after all necessary settings have been made.
Adjusting the exercise settings can take up to a minute.
Further explanation is found in the following abstract "Commandline and commands".
If the connection is successful, a console window will be opened, which is used to interact with the remote server.
Before the interaction can be started, a username is required.
The online exercise starts with user level0 which has to be typed into the commandline and confirmed with enter.
Thereafter, the corresponding password is required, which is also level0.
While typing passwords into a shell, no characters will be shown!
This is not a bug and applied for security reasons.
After typing in the password, it is confirmed by enter.
If the information "Starting the Game" is shown in the shell, the connection to the server has been succeed.
Further information will be shown in the shell, after all necessary settings have been made.
Adjusting the exercise settings can take up to a minute.
Further explanation is found in the following abstract "Commandline and commands".
Shell window under Linux/MacOS
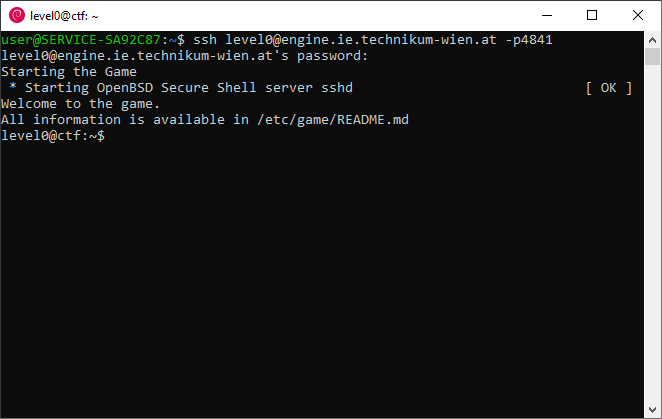
In contrast to Windows systems, there is no need of a third party programe on Linux and MacOS. These operating systems have preinstalled software - called ssh - which is used for SSH connections. The software can be started in the Linux Shell as well as in the Terminal of MacOS systems. The console is shown in the figure below. Note, that its appearance depends on the operating system in use. A successful connection to a remote server is done by declaring host (engine.ie.technikum-wien.at) and port (4841). The port number has to be written after the attribute -p. Additionally, the username (level0) must be declared before a connection is established. The username has to be placed in front of the host name, while username and host are separated by the @ symbol. In order to assign an SSH connection with the programe ssh, the described parameters have to be typed into the commandline in the following way:user@SERVICE-SA92C87:~$ ssh USER@HOST -pPORT
user@SERVICE-SA92C87:~$ ssh level0@engine.ie.technikum-wien.at -p4841
Commandline and commands
All exercises are performed on the command line on a Linux machine.
The following is the command line of the exercise.
level0@ctf:~$
Let's briefly turn to the file system of a Linux system. In a Linux system, the file system consists of folders, files and links. Folders are used to organize files. Links are used to access files and folders under a different name. Everything else is files! All devices that are plugged in are accessible as files. Let's have a look at the contents of the root directory (/). This is the base folder in which all other folders and files are stored. For this you use the command ls, which will be discussed later, and get the following output:
level0@ctf:~$ ls -lah /
total 76K
drwxr-xr-x   1 root root 4.0K Sep 10 08:48 .
drwxr-xr-x   1 root root 4.0K Sep 10 08:48 ..
-rwxr-xr-x   1 root root    0 Sep 10 08:48 .dockerenv
drwxr-xr-x   1 root root 4.0K Apr  4 08:29 bin
drwxr-xr-x   2 root root 4.0K Apr 12  2016 boot
drwxr-xr-x   5 root root  360 Sep 10 08:48 dev
-rwxrwxr-x   1 root root  129 Jun  4 11:10 entrypoint.sh
drwxr-xr-x   1 root root 4.0K Sep 10 08:48 etc
drwxr-xr-x   1 root root 4.0K Jun  4 11:11 home
drwxr-xr-x   1 root root 4.0K Sep 13  2015 lib
drwxr-xr-x   2 root root 4.0K Jan 22  2019 lib64
drwxr-xr-x   2 root root 4.0K Jan 22  2019 media
drwxr-xr-x   2 root root 4.0K Jan 22  2019 mnt
drwxr-xr-x   2 root root 4.0K Jan 22  2019 opt
dr-xr-xr-x 271 root root    0 Sep 10 08:48 proc
drwx------   1 root root 4.0K Jun  4 13:24 root
drwxr-xr-x   1 root root 4.0K Sep 10 08:48 run
drwxr-xr-x   1 root root 4.0K Jan 22  2019 sbin
drwxr-xr-x   2 root root 4.0K Jan 22  2019 srv
dr-xr-xr-x  13 root root    0 Sep 10 07:57 sys
drwxrwx-wx   1 root root 4.0K Apr  4 08:29 tmp
drwxr-xr-x   1 root root 4.0K Jan 22  2019 usr
drwxr-xr-x   1 root root 4.0K Jan 22  2019 var
-
Information and the access rights via the following element drwxr-xr-x
The leading d identifies a folder. If it is a file, it contains -; if it is a link, it contains an l. There are some other letters that refer to special files, which can be read HERE under --format=verbose. Next the access rights are displayed. There are three permissions: Read (r), Write (w) and Execute (x). And there are three different groups for which there are permissions: the owner, the assigned group, and everyone else. If an authorization is not granted, it is marked with a -. - Number of links to the element.
- Owner
- Group
- Size
- Date of last modification
- Name of the element
Absolute and relative paths are used to navigate the file system. The difference between an absolute path and a relative path is that an absolute path represents the entire path of a file, while a relative path represents a file from the current folder. Any path that begins with a / is an absolute path, all other paths are relative paths. Here the special elements from before come into play, only through them it is possible to specify a relative path. With a path specification, the individual path elements are separated by a /. An example for an absolute and a relative path can be seen here:
level0@ctf:/home$ ls -l /entrypoint.sh
-rwxrwxr-x 1 root root 129 Jun  4 11:10 /entrypoint.sh
level0@ctf:/home$ ls -l ../entrypoint.sh
-rwxrwxr-x 1 root root 129 Jun  4 11:10 ../entrypoint.sh
After a brief look at the paths, let's take a look at how to execute a command or start an executable file, also called a program. In order to execute a command or a program, all you usually have to do is enter the name and confirm with Enter. If an executable file is in the folders /bin, /usr/bin, /usr/local/bin, ~/bin or ~/.local/bin, it is the rule. The list of search folders is controlled by the system variable PATH. If the program is not in one of the previously mentioned folders, you can execute it by specifying a relative or absolute path of the program. If, for example, you now have a program called testProgramm and are in the same folder as the program, you can simply execute it via ./testProgramm. In this exercise no own programs are used, all programs are in the search path of the system.
Change directories and print content
To change the current folder, use the command cd.
The target folder is specified as the argument.
Here are a few examples:
level0@ctf:~$ cd /var
level0@ctf:/var$ cd ../etc
level0@ctf:/etc$ cd ~
level0@ctf:~$ cd /home
level0@ctf:/home$ cd level0
level0@ctf:~$ cd .
level0@ctf:~$ cd ../..
level0@ctf:/$ cd
level0@ctf:~$
There are two ways to display the contents of a directory. On the one hand there is the command ls. On the other hand there is the command tree. While the first command exists on every Linux system, the second command has to be installed. For this reason, we will dedicate ourselves to the command ls. The command can be called without an argument, then it works on the current directory. However, you can also specify a variety of absolute and relative path specifications, and it will represent the contents of the directory for each directory. Without further options, only the names of visible items in the specified folder will be displayed. The following is a brief overview of possible useful options:
- -a
- All files, including hidden files, should be displayed.
- -l
- Not only the names, but also interesting attributes are displayed. These attributes have already been mentioned above.
- -h
- Size information should not be given in block sizes, but in comprehensible units.
- -F
-
An indicator is appended to the names if it is not a regular file.
There are the following indicators:
- *
- It's an executable.
- /
- It's a directory.
- =
- It's a Socket.
- >
- It's a Door.
- @
- It's a link.
- |
- It's a named pipe.
Analyzing files
There are several ways to analyze a file.
The following commands are helpful:
- file
- wc
- grep
- diff
- cmp
- cksum
level0@ctf:~$ file /bin/bash
/bin/bash: ELF 64-bit LSB executable, x86-64, version 1 (SYSV), dynamically linked, interpreter /lib64/l, for GNU/Linux 2.6.32, BuildID[sha1]=04eca96c5bf3e9a300952a29ef3218f00487d37b, stripped
level0@ctf:~$ file /entrypoint.sh
/entrypoint.sh: Bourne-Again shell script, ASCII text executable
level0@ctf:~$ file -i /bin/bash
/bin/bash: application/x-executable; charset=binary
level0@ctf:~$ file -i /entrypoint.sh
/entrypoint.sh: text/x-shellscript; charset=us-ascii
- -c
- This option returns the number of bytes of the specified file.
- -w
- This option returns the number of words in the specified file.
- -l
- This option returns the number of lines in the specified file.
level0@ctf:~$ wc /entrypoint.sh
 10  23 129 /entrypoint.sh
level0@ctf:~$ wc -l /entrypoint.sh
10 /entrypoint.sh
level0@ctf:~$ wc -w /entrypoint.sh
23 /entrypoint.sh
level0@ctf:~$ wc -c /entrypoint.sh
129 /entrypoint.sh
The diff command compares two files and shows where the files differ. A comprehensive guide to the command can be found HERE. While diff is tailored for text files because it compares lines by lines, cmp is universal. This program compares files byte by byte. The following example illustrates the difference.
level0@ctf:/tmp/test$ ls -lh
total 8.0K
-rw-rw-r-- 1 level0 level0 63 Sep 12 13:34 datei1
-rw-rw-r-- 1 level0 level0 63 Sep 12 13:34 datei2
level0@ctf:/tmp/test$ diff datei1 datei2
3c3
< Nummer 123
---
> Nummer 321
level0@ctf:/tmp/test$ cmp datei1 datei2
datei1 datei2 differ: char 60, line 3
level0@ctf:/tmp/test$ ls -lh
total 8.0K
-rw-rw-r-- 1 level0 level0 63 Sep 12 13:59 datei1
-rw-rw-r-- 1 level0 level0 63 Sep 12 13:59 datei2
level0@ctf:/tmp/test$ cksum datei1 datei2
1438393268 63 datei1
3289888160 63 datei2
Inspect files
There are several ways to output a file.
The following commands are helpful:
- cat
- sort
- uniq
- less
- head
- tail
The program sort allows to sort the content of a file. The sorted content is exported in the console while the file itself remains unchanged. Without stating any options the order will be alphabetical. For example, the attribute -n generates a numerical sortation. Further options, which are not part of this exercise, can be studied HERE.
Another import program to export file contents is uniq. It analyzes a file line by line, where each line is compared with its line above. If identical lines occur, it will only be exported once. The option -c additionally outputs the number of occurrence of each line. Another import attribute is -u, which does not export multiply occurring lines. Remember, a line is only compared to the line just above.
Larger files can be displayed with the program less. In this program it is possible to scroll with the arrow keys and search for text. Additionally it is also possible to jump between the found text passages.
The names of the two programs head and tail probably let you guess what is possible with the programs. The first program can output any number of lines (10 by default) from the beginning of the file. The second program can output any number of lines from the end of the file.
level0@ctf:~$ cat /entrypoint.sh
#!/bin/bash
set -e

service ssh start

if [ "$1" = '/bin/bash' ]; then
    /bin/su - level0
else
    /bin/su - level0 -c "$@"
fi
level0@ctf:~$ head -n 2 /entrypoint.sh
#!/bin/bash
set -e
level0@ctf:~$ tail -n 2 /entrypoint.sh
    /bin/su - level0 -c "$@"
fi
Finding files
To find an item on Unix, be it a file, a folder, or anything else, use the find command.
The program needs a search path and can be adjusted by various parameters.
The program only searches from the specified search path.
In order to search the entire system, the search path / is used.
It can only find items for which you have appropriate permissions.
A short selection of possible parameters:
- -name and -iname
- These parameters search for a specific name, which must be specified directly after the parameter. The former is case-sensitive, the latter is case-insensitive.
- -type
- This parameter restricts the type of element to be searched for. The type of element to be searched for must be specified. Where f stands for a file, d for a directory, and l for a link.
- -user
- Only files belonging to the specified user are displayed.
- -group
- Only files belonging to a specified group are displayed.
- -size
- Only files of a certain size are displayed. If the specified number has the suffix c, the number indicates the number of bytes. Otherwise the number of blocks is specified.
- -maxdepth
- This parameter specifies how deep the file system should be searched. So -maxdepth 1 means only the search in the current folder.
- -readable -writeable -executable
- These tests check whether the files can be read, written, or executed by the current user.
- -not
- This allows a subsequent test to be inverted.
- The files found are displayed on the console. Each file is on a new line.
- -print0
- The files are displayed on the console. Unlike the previous option, the file names are separated by a character with a numeric value of 0.
- -ls
- The program ls -dils is applied to the found files.
- -exec ... \;
- This makes it possible to apply arbitrary commands to the found files. The command is applied to each file individually. It replaces {} with the name of the current file.
- -exec ... \+
- This makes it possible to apply arbitrary commands to the found files. The command is applied to all found files. It replaces {} with the name of all files.
level0@ctf:~$ find / -maxdepth 1 -executable -type f -ls -exec file '{}' \;
  1706606      0 -rwxr-xr-x   1 root     root            0 Sep 13 09:15 /.dockerenv
/.dockerenv: empty
   918842      4 -rwxrwxr-x   1 root     root          129 Jun  4 11:10 /entrypoint.sh
/entrypoint.sh: Bourne-Again shell script, ASCII text executable
level0@ctf:~$ find / -maxdepth 1 -executable -type f -ls -exec file '{}' \+
  1706606      0 -rwxr-xr-x   1 root     root            0 Sep 13 09:15 /.dockerenv
   918842      4 -rwxrwxr-x   1 root     root          129 Jun  4 11:10 /entrypoint.sh
/.dockerenv:    empty
/entrypoint.sh: Bourne-Again shell script, ASCII text executable
level0@ctf:~$ find / -maxdepth 1 -name '*.sh' -ls -exec file '{}' \;
   918842      4 -rwxrwxr-x   1 root     root          129 Jun  4 11:10 /entrypoint.sh
/entrypoint.sh: Bourne-Again shell script, ASCII text executable
level0@ctf:~$ find / -maxdepth 2 -type f -size 0c -executable -ls
find: '/root': Permission denied
find: '/tmp': Permission denied
  1706606      0 -rwxr-xr-x   1 root     root            0 Sep 13 09:15 /.dockerenv
level0@ctf:~$ find / -maxdepth 2 -type f -size 0c -executable -ls 2>/dev/null
  1706606      0 -rwxr-xr-x   1 root     root            0 Sep 13 09:15 /.dockerenv
Edit files
There are many ways to edit files on a Linux system. Two of the more common programs are Vim, which is installed almost everywhere at least in the version vim.tiny, and nano. An online guide to Vim can be found HERE and HERE. Alternatively you can use the command vimtutor. Editing files is not part of the exercise.
Exercise
The exercise requires you to log on to a remote computer and complete ten levels. The aim of each level is to find the password for the next level. You will be given instructions on how to find the next password in the tutorial and on this page. As soon as you find a file named data.txt with the content Congratulations, you are done in the home directory, you have completed all levels.
The aim of this exercise is to teach you how to use a Linux environment. You learn:- Outputting of files
- Targeted searching
Application
Access to this online exercise is via SSH. Any SSH client can be used. PuTTY is recommended for Windows users. For Linux users the openssh-client is recommended. This can be installed via the package administration. A maximum of 20 persons can access this exercise at the same time. After 10 minutes of inactivity, the game is automatically terminated.
To level 0
You need the following information to access the exercise:
- Host: engine.ie.technikum-wien.at
- Port: 4841
- User Level 0: level0
- Password Level 0: level0
To level 1
The password is in a file called readme in the home directory of the user.
With the password stored in the file it is possible to reach the next level.
Each time a password is found for a level, the program ssh must be used to reach the next level.
The other levels are not accessible from outside, but can only be reached via the localhost address.
So you can use the following command to log in to level 1: ssh level1@localhost.
Commands you may need: ls, cd, cat, file, du, find
To level 2
The password can be found in a file called -
This file is located in the home directory of the user.
Note: The argument - in many programs means that the options ends, and only arguments come.
Consider whether the file system can help you, so you don't have to specify just the single hyphen.
Commands you may need: ls, cd, cat, file, du, find
To level 3
The password for the next level is in a file called spaces in this filename.
Commands you may need: ls, cd, cat, file, du, find
To level 4
The password is stored in a hidden file in the directory inhere.
Commands you may need: ls, cd, cat, file, du, find
To level 5
The password is the only readable (pure ASCII text) file in the inhere directory.
If you have changed the terminal by the output of the unreadable files so far that you cannot work with it, use the reset command to get it working again.
Commands you may need: ls, cd, cat, file, du, find
To level 6
The password is somewhere in the inhere directory and has the following properties:
- ASCII text
- 41 bytes large
- not executable
To level 7
The password is somewhere on the server and has the following properties:
- User: level7
- Group: level6
Note! While solving this level, Unix errors can occur. Think about how to bypass these errors. Furthermore, it is recommended to avoid searching the entire folder tree. Instead, use a maximum folder depth of 6.
To level 8
The password is in the file data.txt next to the word million.
Commands you may need: grep, sort, uniq, strings, base64
To level 9
The password is the only unique line in the file data.txt.
Commands you may need: grep, sort, uniq, strings, base64
To level 10
The password is stored as base64 encoded data in the file data.txt.
Commands you may need: grep, sort, uniq, strings, base64
Considerations
After performing the online exercise, you are be able to use the Linux command line.
You have seen how to find and view files.
You have also learned how to run various programs.
In short, you have learned the basics of interacting with the command line.
Self-Evaluation
Below you find questions, which you can solve after succeeding the online exercise. The solutions are shown by clicking on the questions.
Which code do you use to connect with a remote server?
ssh USER@SERVER -p PORT
Which command is used in order to show hidden files of a certain folder?
ls PATH -a
What can be done with the attribute -exec applied on the program find?
This attribute enables to apply another program on files found by find.
Which command is used to determine the number of rows of a file?
file PATH/FILENAME -l
What is the program grep used for?
It allows to search for a certain term in a file.
Which information does the command line PARAM1@PARAM2:~$ contain?
The first two elements show, that user PARAM1 is logged on the server PARAM2. The two elements are separated by the @symbol. Additionally, the current working directory is given after the : symbol, where ~$ indicates the home directory.
Take-Home-Messages
- ssh program to connect with a remote server
- ls to display the content of a folder
- cd to change the working directory
- cat to show the content of a file
- find to search for files and folders
- file to analyze a file
- sort to sort the content of a file
Links and Literaure
Hier you find a summary of the linked literature.
- download PuTTY
- openSSH installation guide for Windows
- openSSH for Linux/MacOS
- openSSH for portable devices
- BASH basic course
- advanced BASH guide
- description of whole BASH commands
- description of access rights
- description Socket (=)
- description Door (>)
- description link (@)
- description named pipe (|)
- usage of the command diff
- attributes of the command sort
- tutorial of the command vim
- usage of the command vim
Further Topics
Redirects
The input and/or output is redirected to files.Pipes
The output of one program becomes the input of another program.Scripting
A shell script is a sequence of commands that are to be executed. However, to create more complex shell scripts, several components are missing. These are among others:- Branches
- Loops
- Variables
- The sed program
systemd
This can be used to create services. Services are programs that are started at system startup and perform certain tasks.